Well-cared-for kitchen knives are the bread and butter of any cook’s arsenal. We spoke with chef Peter Sidwell about how you can keep yours in tip-top condition — from properly sharpening and honing the blade to safely disposing of it.
Before we start, it’s important to remember that knives can be extremely dangerous. Always take caution when handling a knife, no matter the size, to reduce your chances of hurting yourself.
Contents
- What’s the difference between sharpening and honing?
- How to sharpen a knife
- How to hone a knife
- How to store knives properly
- How to safely dispose of kitchen knives
- How to make your knives last longer
- What are the best tools for maintaining your kitchen knives?
What’s the difference between sharpening and honing a knife?
“Honing is a process you do before sharpening,” says Peter. General wear and tear can bend the flat surface of a knife over time, giving you a curved line when you try to cut into something.
Honing reforms the shape of the knife, coaxing the blade back into a straight position. “It helps prepare the knife for sharpening, particularly if you haven’t sharpened the knife much before.” It should be your go-to trick for restoring your blade before you reach for the sharpener.
Sharpening a knife is exactly what it sounds like — if your blade isn’t gliding through ingredients as easily as it used to, you’ll want to use a tool to polish it and restore its sharp edge.
While honing a knife doesn’t take anything away from the actual blade, it just fixes the angle, sharpening shaves away bits of metal to remove the dull edge and give it a fine point.
So even though you’ll need to do both to help you dice and slice with ease, it’s best to hone your knife often but only sharpen when you need to. Knife in good condition already? Skip to how to hone by clicking here.
Along with being annoying to cut with, a dull knife can be dangerous. “If your knife isn’t sharp, you’ll have to put more force into cutting. And that’s when your blade can slip and cut you,” Peter warns.
This is why regularly honing and properly sharpening your knives, and using the right chopping board, are the best way to keep your fingers safe and your meals in good shape.
How to sharpen a knife
As with many things in life, prevention is better than the solution. “Try and not let it get blunt in the first place,” Peter advises: “keep on top of it with some simple maintenance.” Simple maintenance in this case, is giving your knife collection a sharpen every now and again.
When you sharpen a knife, you’ll need to use a tool that’s made of a material harder than the blade. This is why sharpeners are often made of stone or ceramic rather than steel.
The process and motion are the same for whichever tool you settle on: you draw the knife edge across an abrasive surface to shave off metal and create a sharp point.
But as knives can come in a range of shapes, materials, and finishes, there are different types of sharpeners that you can use to help you get the best results.
The most common types of sharpeners are:
- Sharpening stones — Such as whetstones and diamond stones
- Sharpeners — Like handheld and electric sharpeners

How to sharpen a knife with a whetstone
The most common way to sharpen a knife is by using a whetstone, like this one from MasterClass. A whetstone is a tough block with a rough surface that you draw your knife’s edge over. Think of it like sandpaper!
Using a whetstone is an old school method that many professionals favour over more cutting-edge devices (see what we did there?), as they give you more control over the end result. You can tailor your technique to suit your knife, something that you can’t do with simple draw-through sharpeners.
On the flip side, they can take a bit more expertise and getting used to if you’ve never sharpened a knife before.
- If your whetstone requires soaking, submerge it into water or oil so that it’s fully saturated and you don’t see any bubbles floating out of it. Some whetstones are designed to be soaked before use, so always check the manufacturer’s instructions before you throw away the packaging.
- If the instructions don’t mention that it needs to be soaked, you can start by placing a damp tea towel down onto a flat surface like a countertop or table. Then pop your whetstone on top. The tea towel will keep your whetstone from sliding around. If your whetstone has two different sides with differing levels of abrasiveness, start with the coarser side facing upwards.
- Wet your knife’s blade with a bit of water to reduce the friction.
- Hold your blade onto the stone at a 20-degree angle with the sharp edge touching the surface of the whetstone. The tip should be pointing away from you.
- With your hand that’s not holding the knife, rest your fingers on the flat surface of the blade and let your thumb fall onto the handle. Your fingers should be well clear of the knife’s edge.
- Slowly but firmly drag the knife across the whetstone, following the curve of the blade. Make sure that you’re holding it at the same angle as you move.
- Repeat this three to four times.
- Flip your knife over and repeat to sharpen the other side of the edge.
- Then you can turn your whetstone over to reveal the fine-grind side.
- Carry out steps four to seven again but on the stone’s smoother side.
- Give the blade a clean before using.
If your knife is especially dull, like you’re mangling rather than mincing your ingredients, it’s best to sharpen it using both sides of a whetstone. But if you take care of it and hone it often, it won’t need as much attention and you can skip straight to the fine-grind side.

How to use a knife sharpener
Aspiring home cooks may want something more beginner-friendly, which is why a knife sharpener can be a better choice.
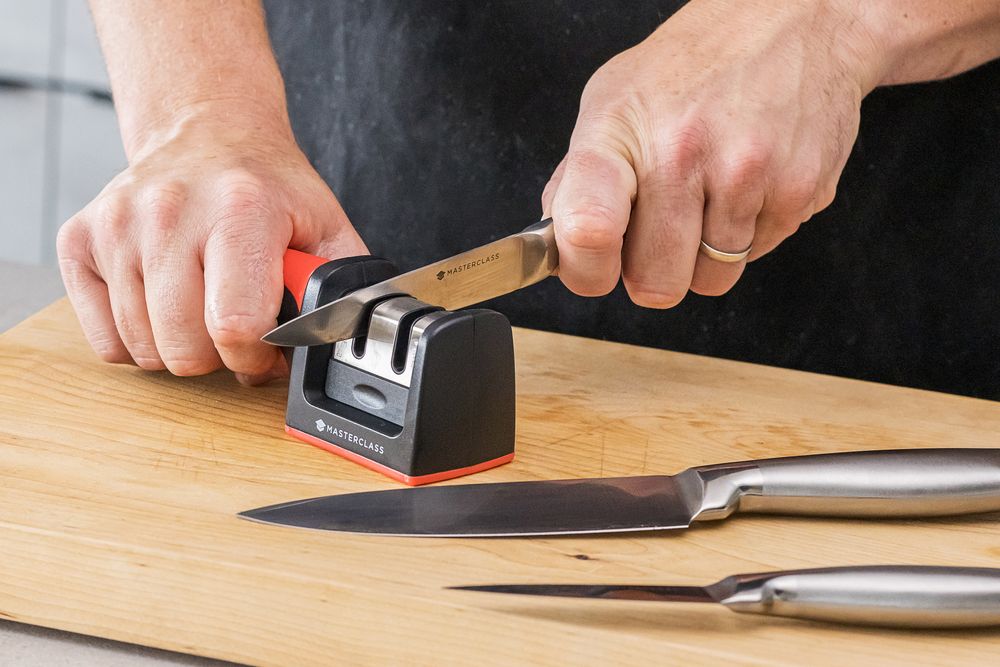
“I would suggest using a fixed sharpener,” agrees Peter: “the angle is always the same and already set for you.” This makes them almost foolproof to use — simply draw your blade through the slot. In other words, no fussing with angles and more time finessing your fine slicing. Some may also have a slot to hone, too.
Fixed sharpeners can be handheld or electric. Handheld, or drawthrough, sharpeners involve pulling the blade through a sharpening slot, while electric sharpeners have spinning stones that grind the blade to a point. Whichever variation you have, the method to use them is the same.
These tools can be handy when you’re in a pinch or just starting out, but they might not be the best long-term solution.
The lack of control can cause damage to your knife over time. Starting with a sharpener is fine, but once you’ve got to grips with the basics, try upgrading to a whetstone.
Most draw-through sharpeners are used in the same way, but check the instructions before you use it for the first time.
- Rest your sharpener on a flat, secure surface like a table or countertop
- Place your knife, sharp edge-side down, into the sharpening slot of your sharpener. Try to position it as far forward into the slot as possible, with the handle touching the sharpener, the heel of the blade inside the sharpener, and as much of the metal blade sticking out as possible.
- While securely holding the handle of the knife, drag it towards you and pass the edge through the sharpener.
- Repeat this three to four times.
- Wash the knife before using it.
How to sharpen a bread knife or serrated knife
It’s easy to take one look at a bread knife and wonder how you even go about sharpening one. Don’t let its serrations put you off — you can, in fact, sharpen a knife with a serrated edge.
Unlike its other knife siblings, a bread knife needs a sharpening rod or steel to keep it in prime condition. The technique is also a little different. “Run the knife up and down the steel on each serration 5-6 times,” says Peter. “This process can be done once a month and it will keep your knife sharp.”
- Choose a sharpening rod that snugly fits into each of the serrations of your knife. If the rod is too big, it won’t be able to fit in and properly sharpen each section.
- Serrated knives only need to be sharpened on one side; this is usually the right side. You can check your knife by looking at which side the serrations are most prominent — the other side will be smooth and your sharpening rod won’t naturally fit into each serration.
- Lay the barrel of the sharpening rod into the first serration. It should fit snugly and follow the angle of the original grind.
- Use a light pressure to move the knife up and down 5-6 times on the steel, always working at the angle of the existing serration.
- Move the steel onto the next serration and repeat steps four and five.
- Continue this as you sharpen each tooth on the blade.
- As you sharpen the serrations on one side, a burr will form on the other side of the knife. To file this down, flip the knife over so that the flat side is resting on the steel.
- Using a very light pressure and holding the knife flatly over the steel, glide it in one smooth motion across the length of the knife. You should be pulling the knife horizontally towards you in one, singular motion.
- Carefully wash your knife before use.
How to sharpen a ceramic knife
Ceramic knives, while pretty to admire on your knife rack, can be problematic when it comes to sharpening.
They’re made differently from traditional knives. Ceramic knives are very brittle and are more likely to break or chip if you treat them like a steel blade.
To save yourself from the disappointment of snapping your ceramic knife, there is one key rule to remember:
Never apply too much pressure on the blade laterally — Don’t hold the knife by its handle, and only its handle, when sharpening it. In this position, the knife is only being supported by two points: the handle and the point where it touches the sharpening stone. Too much pressure applied length-wise is enough to say goodbye to your trusty blade.
It’s also recommended to use a diamond stone to sharpen your ceramic knife. A diamond stone is similar to a regular whetstone, except it has diamond particles embedded into its surface. These particles make it extremely strong and hard-wearing so you don’t have to apply as much pressure when sharpening a ceramic knife.
- Place the diamond sharpening stone onto a flat surface.
- Position your ceramic knife on the stone, holding it at a close angle. It should be nearly flat on the stone to reduce the amount of pressure you’re exerting.
- While holding the knife handle with one hand, rest the fingers of your other hand evenly across the surface of the knife. It’s a similar position to sharpening a regular knife with a whetstone, but you should try to press down with more of your fingers. This will support more of the blade surface area.
- Apply a gentle force with your fingers as you slowly draw the knife across the stone. Use smooth motions and apply very slight pressure to reduce the chances of the blade snapping.
- Pass the edge over the diamond stone 3-4 times.
- Repeat this on the other side of the knife.
- Wash before using.

How to hone a knife
After you’ve sharpened your knife, you shouldn’t need to top up the blade’s edge for a while. Instead, you can use a honing steel to help keep the blade straight.
This can be done weekly, or even after each use, as it won’t wear the metal down like a sharpener does.
If you have a sharpener with a built-in honing slot, you can use the same method and motion to straighten your knife.
Alternatively, you can use a honing steel. You’ve probably seen chefs working their knives along one before; you might’ve even thought it was used to sharpen the knife. These steels have a coarse edge that gently nudges the flat side of a knife into proper alignment when it’s drawn across the steel.
Honing steels are much more straightforward to use than a sharpener as there’s little risk of filing away the point of a knife. “Use a coarse steel by pointing it downwards and running the knife’s edge over each side of the steel 8-10 times,” says Peter, “and always remember to clean your knives after.”

How to store knives properly
After you’ve put in the effort to restore your knives to pristine condition, don’t undo your hard work by keeping them loose in a drawer or utensil stand. Not only is this incredibly dangerous, but it can cause your knives to go blunt faster.
Instead, store them in a knife block or rack. Peter’s personal favourite? “I keep mine in a dedicated drawer that is segregated,” he tells us, “and each knife has a sheath on.” Sheaths offer extra protection for your knives and your fingers.
Whether you choose a block, rack, or drawer is up to you; each has its benefits and drawbacks.
- Knife blocks — These keep your tools in easy reach and are the safest choice as the blades are completely concealed, minimising any potential nicks or cuts. On the contrary, they can be a lot more difficult to clean and the individual slots can harbour bacteria.
- Knife racks — If you’ve invested in a set of fancy Japanese Damascus steel knives, you’ll probably want to keep them out on display in a rack. While they are a more child-friendly option and take up no counter space, they do require fixing into the wall.
- Knife drawers — For complete peace of mind and a clear countertop, a separate drawer with a knife holder could be your best bet. Smaller kitchens may not have the space to dedicate a whole drawer for knives though. These are better suited to cooks with a more extensive knife collection.
How to safely dispose of kitchen knives
The safest way to dispose of your old kitchen knives is to place them in your bin along with your usual household waste. Yes, this is legal, and no, it’s only as suspicious as you make it. “
However, you shouldn’t just toss an old blade in the bin uncovered: this could damage your bin, or worse, cut someone who is collecting your rubbish.
Peter advises: “Wrap them up in a cloth, newspaper, bubble sheet, or, most preferred, cardboard. Then tape the entire blade securely, so there are no chances of any injuries. Then it is okay to dispose of.”
You can place an old cork on the tip to cover the point. Then make sure the entire blade edge is covered up with the material of your choice and use a strong tape, like parcel or duct tape, to keep the knife compact inside the makeshift sheath. Be sure to tape the cloth or cardboard to the handle too, to avoid the knife from sliding out.
Once your kitchen knife is secured, then you can place it into your general household waste bin.

How to make your knives last longer
1. Wash them by hand
Dishwashers are the kryptonite of any kitchen knife. The powerful jostling motions of the water and machine can dull, or even chip, a blade and dishwasher detergents can corrode the steel itself. In other words, just hand wash them.
Use a sponge that’s tough enough to remove any residue, but soft enough that it won’t dull or scuff the metal blade. Abrasive scourers can buff away any etched logos or designs on fancier knives, and never leave a knife to soak in the sink. This can cause the metal to rust and weaken the handle.
After washing, immediately dry your knife with a tea towel.
2. Regularly maintain their sharpness
Peter puts it simply: “Keep them sharp.” Staying on top of their sharpness might not necessarily make them last longer, but it’s an essential part of knife maintenance.
“A sharp knife is a joy to work with.” It’ll also make your life in the kitchen much easier.
The amount you sharpen them will depend on how often you use them, but yearly is a safe rule of thumb. As for honing, you can hone them after every use to realign the blade for the next time you want to julienne.
3. Store them properly
Whether it’s a block, rack, or drawer, find a knife storage solution that works for you and your kitchen.
Organisation is key here — you want to be able to quickly find your paring knife when you’re mid-recipe. Rummaging through utensil stands or messy cutlery drawers can be hazardous to your fingers and your food!
4. Cut on a suitable surface
Not all chopping boards are made equal. Plastic and wood have a slight give when cut into, which helps to preserve your knife’s edge, but the slits in plastic boards can be a breeding ground for bacteria. Wood tends to be naturally antibacterial, so it can be a better choice.
Steer clear of chopping boards made from glass, ceramic, or metal. While pretty to serve on and impress your guests, the hard surface can take a toll on your knives.
What are the best tools for maintaining your kitchen knives?
Best for professional results: MasterClass Combination Sharpening Stone

“Sharpening stones are great for people who want to spend time making sure their knives are super sharp,” says Peter.
You control the angle and level of sharpness that you create, so they’re excellent for super precise results. This whetstone from MasterClass has a secure, anti-slip base and also has a side for honing too.
Best for beginners: AnySharp Silver Knife Sharpener

This self-certified “World’s Best Knife Sharpener” makes at-home knife maintenance a breeze. Its patented design can extend the life of almost any knife, including serrated knives.
Simply draw your knife through the pre-angled slot to restore even the dullest blade to a sharp cutting edge.
Best for storage: KitchenCraft Magnetic Knife Rack

“Having your knife collection on a rack means they are so easy to grab when you need them,” says Peter.
This magnetic rack safely stores them while keeping them on display. It’s long enough to hold up to 10 knives and the wall-mounted fixture means you can keep it up and out of reach of curious hands.
Keep your kitchen knives a cut above the rest
Whether you’re chiffonading herbs or slicing through a steak, a well-cared-for knife can save you time and help you to level up your knife work.
Find the best tools to sharpen and hone your kitchen knives, whether it’s a classic whetstone or an all-in-one sharpener. Whatever your choice, it's sure to keep your collection a cut above the rest!